If you’re using a Raspberry Pi as a Headless Plex Media Server you may find it difficult to gain access to, or add some directories to, your Rapsberry Pi. A headless environment means there isn’t a desktop environment for the Pi. More than likely you’ll need to move files from one system to another, but you’ll find that drag and drop isn’t an option without a little extra software.
If you’re an Apple Mac user I recommend using this guide to install Netatalk as an Apple Filing Protocol (AFP) to add and manage file directories in your various Raspberry Pi projects. If you’re a Windows user you might be better off seeking a tutorial on installing and using Samba for the same purpose, or you can opt to use an FTP solution.
My primary machine for managing my various headless Raspberry Pi projects is an Apple Mac Mini using the M1 chip. Netatalk is the software I use to facilitate adding Bandcamp purchases to my Headless Plex Media Server and for occasionally tinkering with and managing the settings for a few Headless Plexamp installations that I have running.
Look at the Netatalk Website and you’ll see that Netatalk is a robust, complex and highly configurable open-source software solution. If that overwhelms you, don’t worry. This guide will take you through the process of installing and using Netatalk with only the most basic settings.
You’ll want to have SSH access to your Raspberry Pi in order to install the Netatalk software. If you haven’t been through the process of accessing your Raspberry Pi via SSH or Secure Shell you should take a few minutes to run through our previous guide: How To SSH or Secure Shell into your Raspberry Pi
Install Netatalk to add files directly to your Headless Raspberry Pi

Follow this guide to install and use Netatalk. Use you Apple macOS computer to access your Micro SD card or any other USB storage device you have connected to your Headless Raspberry Pi and begin adding files from Bandcamp, Apple Music, or your digital media library. This post assumes you already have a Raspberry Pi up and running with an Operating System installed and SSH access to install new software.
Project Cost: $0 – $0
Total Time: 10 Min.
Tools and Supplies
Here is a list of tools and equipment that you should have on hand before you begin this project:
Tools
-
Terminal or another CLI tool
Most personal computers come with a Command-line interface (CLI) tool built-in. I typically use the Terminal application built into my Mac, but there are plenty of other options out there.
Supplies
-
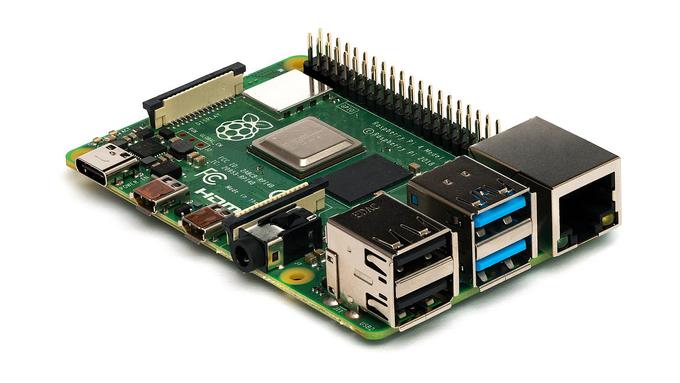
A Raspberry Pi 4 with an Operating System already installed
This post assumes you already have a Raspberry Pi up and running with an Operating System installed.
If you still need a Raspberry Pi, I would recommend buying a Raspberry Pi 4 Starter Kit from CanaKit. They offer a variety of kits, but each configuration will include everything you’ll need to get started. In writing this tutorial I’m using a Raspberry Pi 4 with 4GB of RAM.
If you haven’t installed an operating system you should refer to our Beginner’s Guide to Installing Raspberry Pi OS Lite.
-
A Micro SD card
A Micro SD card with a minimum of 4 to 8 GB storage space. I am using a 32 GB Micro SD card that was included with a kit from Canakit.
Many Raspberry Pi kits will include a Micro SD card, so if you elect to purchase a Raspberry Pi 4 Starter Kit, make sure you pick one that includes a Micro SD card.
-
SSH into your Raspberry Pi
When you installed your Raspberry Pi Operating System using the Raspberry Pi Imager app, you set up a username and a hostname. These are essentially the username and path to SSH into your Raspberry Pi.
Launch your command-line interface app (Terminal) and enter the following command, where username is the SSH username and hostname is the hostname you created in Raspberry Pi Imager:
ssh username@hostname.localThen hit Enter
-
Update and upgrade your Raspberry Pi
in Terminal, run the following command to ensure your Raspberry Pi Operating System is up to date:
sudo apt-get update && sudo apt-get upgradeSometimes this process can take a few minutes. As long as your Terminal window is still scrolling everything should be working as intended, but watch for prompts where you may need to acknowledge some installations and upgrades.
-
Install Netatalk
Netatalk is an open source software solution that will allow you to access your Raspberry Pi file directories from a remote computer (like your Mac).
This essentially allows you to run a Headless Raspberry Pi Operating System while still having access to the file storage through your main computer’s Finder.
Install Netatalk with the following command in Terminal:
sudo apt install netatalkThis might take a couple of minutes and you may need to confirm some installations, so keep an eye on Terminal to acknowledge the installation where needed.
-
Access the Netatalk configuration file
With Netatalk installed you’ll need to make a few changes to the Netatalk Configuration file.
To access the Netatalk Configuration file enter the following command:
sudo nano /etc/netatalk/afp.confHit Enter
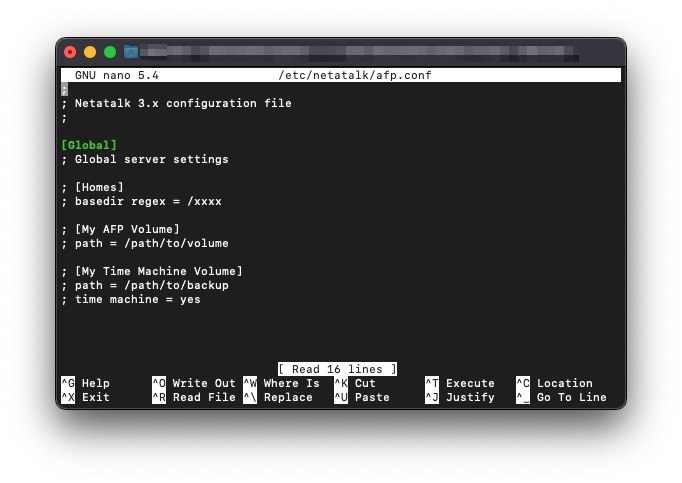
Access the Netatalk configuration file -
Add a Home directory to Netatalk
This is where Netatalk gets a little bit awkward to work with, but for this guide you’re only going to make basic changes. More advanced settings will be covered in another guide.
All you’ll need to do is edit a couple lines in the Netatalk configuration file:
This line needs to have the semi-colon removed:
; [Homes]So it should now look like this:
[Homes]The following line needs to have the semi-colon removed, and you should replace the xxxx after the forward slash at the end of the line with home
; basedir regex = /xxxxSo it should now look like this:
basedir regex = /homeYour Netatalk configuration file should now look something like this:
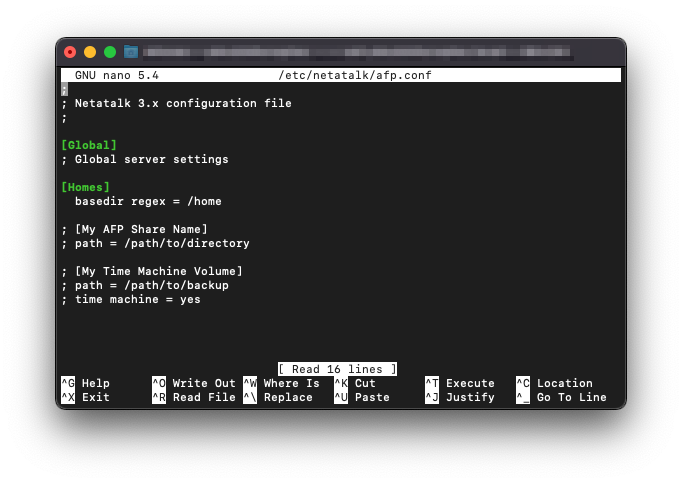
Add a Home directory to Netatalk -
Save the new Netatalk Configuration settings
You now have the most basic and simple Netatalk configuration settings that will allow you to directly access your Raspberry Pi storage directories.
To save the Netatalk configuration use the following commands in Terminal:
control + xThen
Y (or Yes)Hit Enter if you’re not automatically taken back to the previous Terminal view.
-
Restart Netatalk
Anytime you make changes to your Netatalk confirguration file you’ll need to restart Netatalk for the changes to take effect.
To finalize your changes you can restart Netatalk with the following command in Terminal:
sudo systemctl restart netatalkGive this a moment for Netatalk to restart. There may not be any visual feedback in your Terminal, but this should only take a moment regardless.
-
Get the IP address for your Raspberry Pi
Now find the IP address for your Raspberry Pi using the following command:
hostname -ICopy and save the IP address. The format will be #.#.#.# and it will look something like this:
0.0.1.24 2601:5631:e190:68d3:500f:e970:e970You only want those first 4 numbers and you can ignore anything that comes after.
-
Connect to the server for your Raspberry Pi using Netatalk
Almost there!
Open Finder and in the main navigation bar click Go -> Connect to Server (⌘k).
In the field for Server Address enter the following AFP address:
afp://#.#.#.#Remember to replace the IP address in this example with your own.
Click Connect
If you’re prompted to Connect to the Raspberry Pi Netatalk Server again just click Connect again.
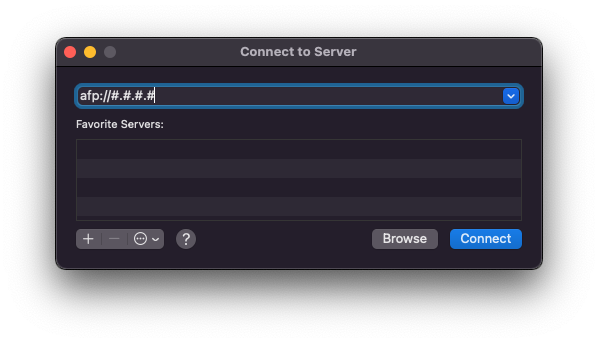
Connect to the server for your Raspberry Pi using Netatalk -
Enter your Username and Password
Now enter your Username and Password. This will be the same username and password you used when you installed and set up your Raspberry Pi OS Lite.
For example I’m using my Raspberry Pi to run a Headless Plex Server, so I’ve set up my Raspberry Pi with a user name plex, then entered the password I’ve set up for the plex user.
Click Connect
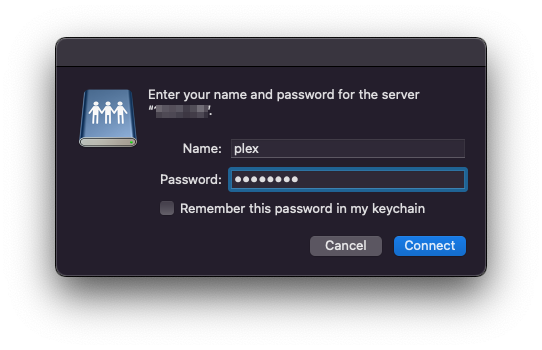
Enter your Username and Password -
Select the directory to mount and add a folder for your digital media
Your Finder will now auto-navigate you to a new server directory called Pi’s Home (or similar).
The name of the server might be slightly different depending on the default User for your Raspberry Pi.
For example I’m using my Raspberry Pi to run a Headless Plex Server, so I’ve set up my Raspberry Pi with a Plex user. My server is called plex’s home because I’ve added Plex as the main user.
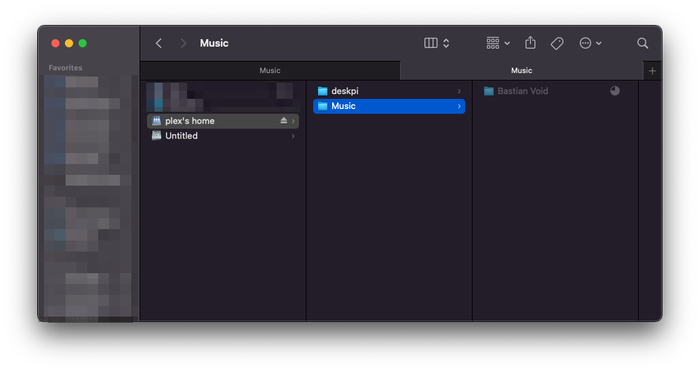
In the screenshot below you can see where I’ve navigated to my Raspberry Pi Server called plex’s home, then I’ve created a new directory called Music, and I’ve started uploading a recent Bandcamp purchase from the artist Bastian Void.
From here I’ll be able to reference this folder from my Plex account to make more of my digital music library available to stream from anywhere.
Select the directory to mount and add a folder for your digital media